Goal-Based Vector Field Pathfinding (Flow Field)
Goal-Based Vector Field Pathfinding, also known as Flow Field Pathfinding, using a 3D grid and terrain height.
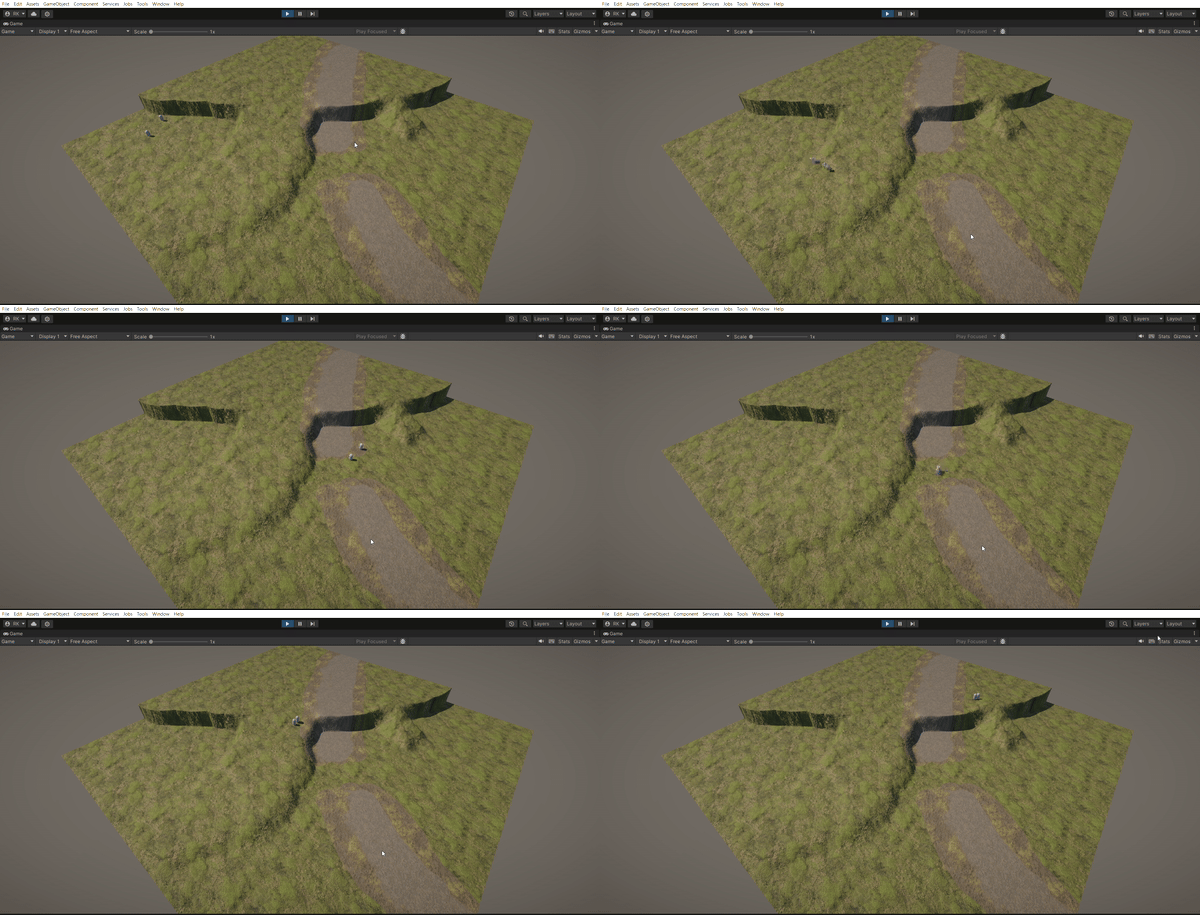
In this article we will talk about Goal-Based Vector Field Pathfinding, also known as Flow Field Pathfinding. This is a pathfinding algorithm that is based on the concept of vector fields. The idea is to create a grid of vectors that point towards the goal, and then use these vectors to guide the agent to the goal. I want to keep this article about the algorithm itself, so I won’t be talking about the implementation of the grid or the agent.
I will be using a 3D grid to represent the world and the agents will be moving using the grid directions.
Pathfinding algorithms are used in simulations and games extensively since they are a fundamental part of them. There are many pathfinding algorithms out there. Some of the more known ones are , Dijkstra, BFS, DFS, etc. We will actually use BFS to create the integration field.
Vector Fields
Before getting too ahead of ourselves, let’s talk about vector fields. Let’s see a formal definition:
Given a subset of , a vector field is represented by a vector-valued function
in standard Cartesian coordinates
This is of course for Euclidean spaces. The definition might sound a bit abstract, but it’s actually quite simple. A vector field is just a function that assigns a vector to each point in space. This can be used to represent things like fluid flow, magnetic fields, and many other things.
For example,
is a vector field that assigns the vector to every point in the plane. And it looks like this:
We will create a vector field that points towards the destination cell. We won’t be dealing with a function, instead we will create our vector field using 2 scalar fields.
Goal-Based Vector Field Pathfinding
Let’s talk about the algorithm. It will be a bit different from other flow field pathfinding algorithm tutorials, when I was researching about this topic, I found that they all use a 2D grid to represent the world. We will use the terrain’s height when creating the cost field and the cells will be on different heights, we will see how it affects the pathfinding.
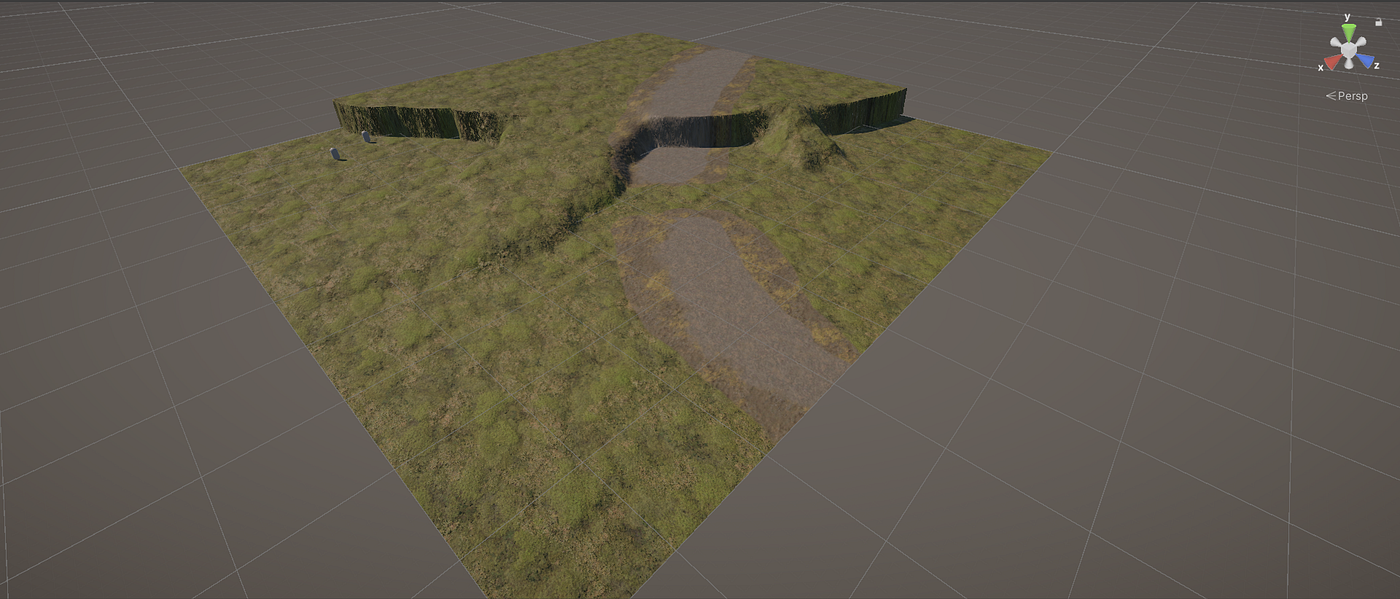
This will be our terrain but the algorithm can be used in any shaped terrain, so one can modify the game terrain freely without having to worry about the pathfinding algorithm being broken. As you can see the terrain has 2 different heights and 2 paths that lead to the higher ground, one is a lot smoother than the other but the smoother path is also longer.
In this implementation of the algorithm the agents will actually choose the smoother path, I wanted to remark this in the beginning since it might not be the desired behaviour for some.
Cost Field
For me, this was actually the most tricky part of the algorithm to implement, since I wanted to use the terrain’s height to create the cost field. I’ve tried several approaches such as, making all cells have the same cost, making cells have a base cost that depends on height and then make each cell have an average cost of its neighbours, etc.
With some of my earlier approaches, I was increasing the cost of cells that are on the higher ground no matter what but if you think about it, if the agent is already at the high ground and simply wants to move forward while staying at the same height, it shouldn’t be penalized.
The approach that I’ve decided to be the best was to dramatically increase the cost of cells that have a certain height difference with their neighbours.
Let’s see the cost field of our terrain:
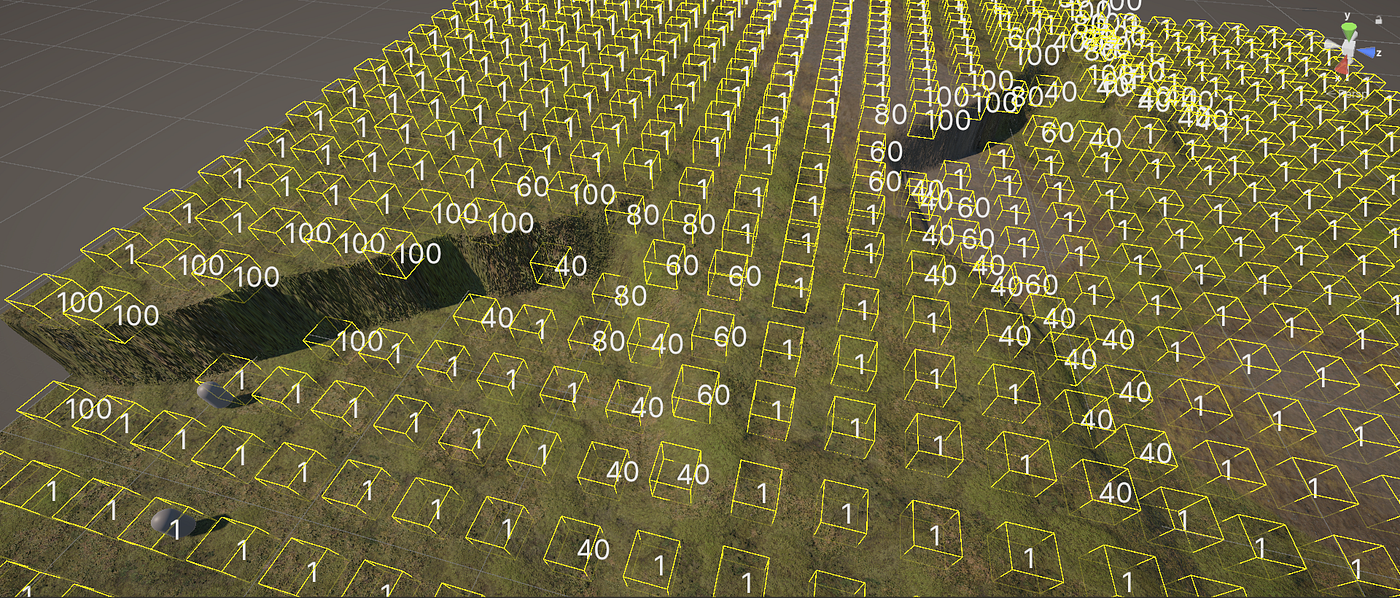
As you can see, only the cells that have a significant height difference with their neighbours have a high cost. Which means it isn’t favorable by agents to climb steep slopes. Let’s see how this looks in the code:
public void CreateCostField()
{
    foreach (Cell cell in grid)
    {
        List<Cell> neighbours = GetNeighbourCells(cell.gridPosition, GridDirection.CardinalAndIntercardinalDirections);

        foreach (Cell neighbour in neighbours)
        {
            if (Mathf.Abs(neighbour.height - cell.height) >= 2)
            {
                cell.cost = Mathf.Abs(neighbour.height - cell.height) * 20;
                neighbour.cost = Mathf.Abs(neighbour.height - cell.height) * 20;
            }
            else
            {
                cell.cost = 1;
            }
        }
    }
}
So we only increase the cost of the cells that have a height difference of 2 or more with their neighbours. I think the code is pretty self-explanatory. We will use this cost field to create the integration field.
Integration Field
As stated before, to create the integration field we will use the cost field. First of all we will choose a destination cell and then set its cost and best cost to 0, this will make the cell the most attractive cell in our 3D grid. Then there isn’t much to do, we will just iterate over the cells and update their cost and best cost based on their neighbours using the BFS algorithm. Let’s see our integration field:
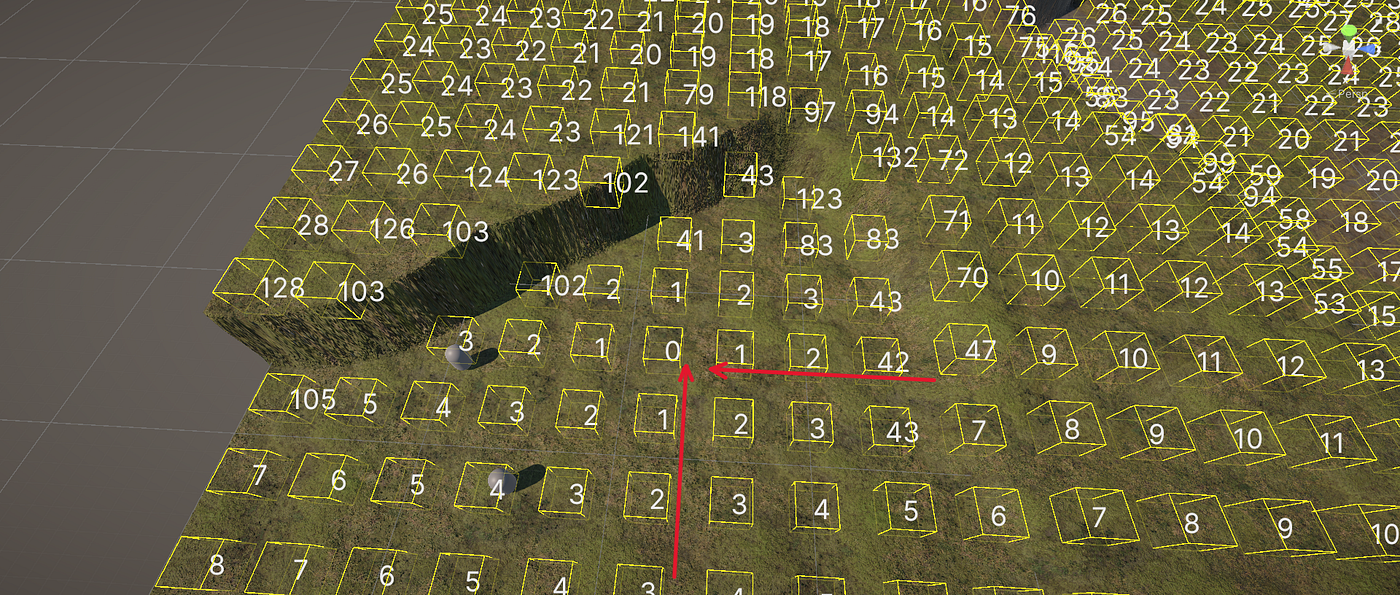
If you follow the cells in the cardinal directions you can see the effect of the BFS algorithm. To explain it a bit more, for each neighbour cell we calculate
If this newCost is less than the neighbour’s bestCost we update the neighbour’s bestCost and add the neighbour to the queue.
The bestCost of a cell represents the minimum total cost to reach the destination cell from that cell.
We are going to use the best cost to calculate which direction the agent should go to minimize the total cost. Let’s see how this looks in the code:
public void CreateIntegrationField(Cell _destination)
{
    destination = _destination;
    destination.cost = 0;
    destination.bestCost = 0;

    Queue<Cell> openSet = new Queue<Cell>();
    openSet.Enqueue(destination);
    while (openSet.Count > 0)
    {
        Cell currentCell = openSet.Dequeue();
        List<Cell> neighbours = GetNeighbourCells(currentCell.gridPosition, GridDirection.CardinalDirections);
        foreach (Cell neighbour in neighbours)
        {
            float newCost = neighbour.cost + currentCell.bestCost;

            if (newCost < neighbour.bestCost)
            {
                neighbour.bestCost = newCost;
                openSet.Enqueue(neighbour);
            }
        }
    }
}
Keep in mind we have to have a destination cell to be able to create the integration field.
Vector Field
Now that we have created both the cost field and the integration field, we can create the vector field. The last part is the easiest section of the algorithm with just a little bit of twist. We will once again iterate over all the cells and calculate the vector that points towards the neighbour with the lowest best cost. The twist is that we only do this for the cells that have a height difference of 1 so our precious agent doesn’t fall off a cliff. Let’s see our vector field:
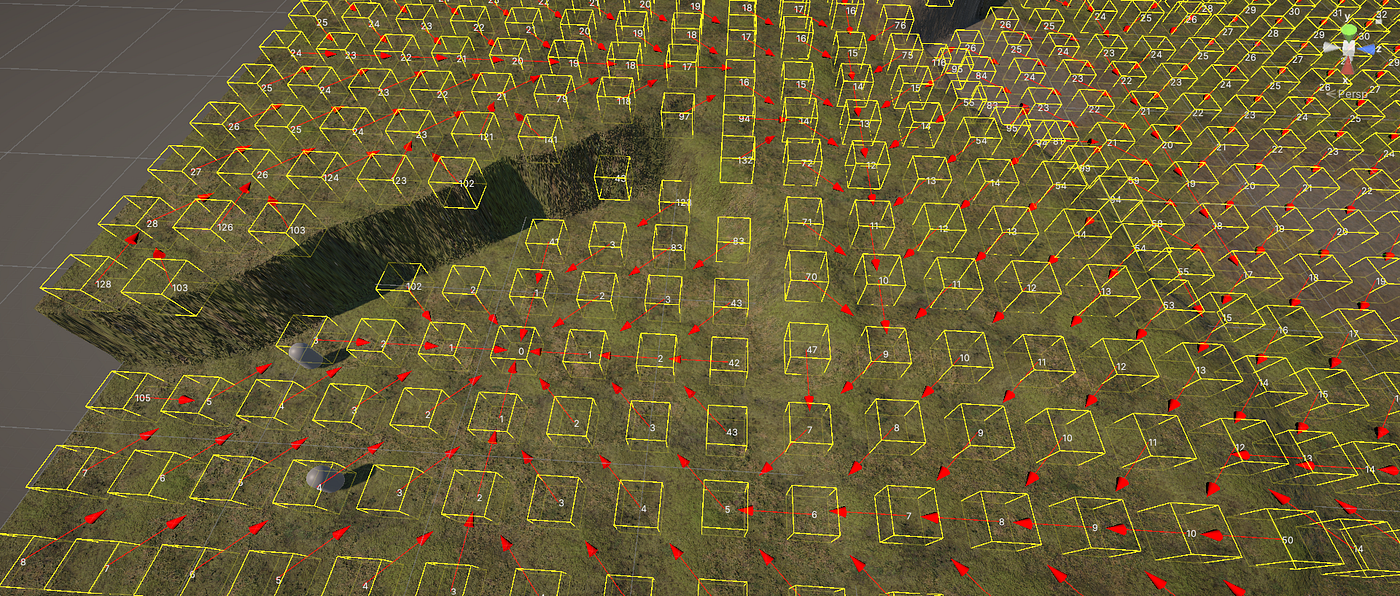
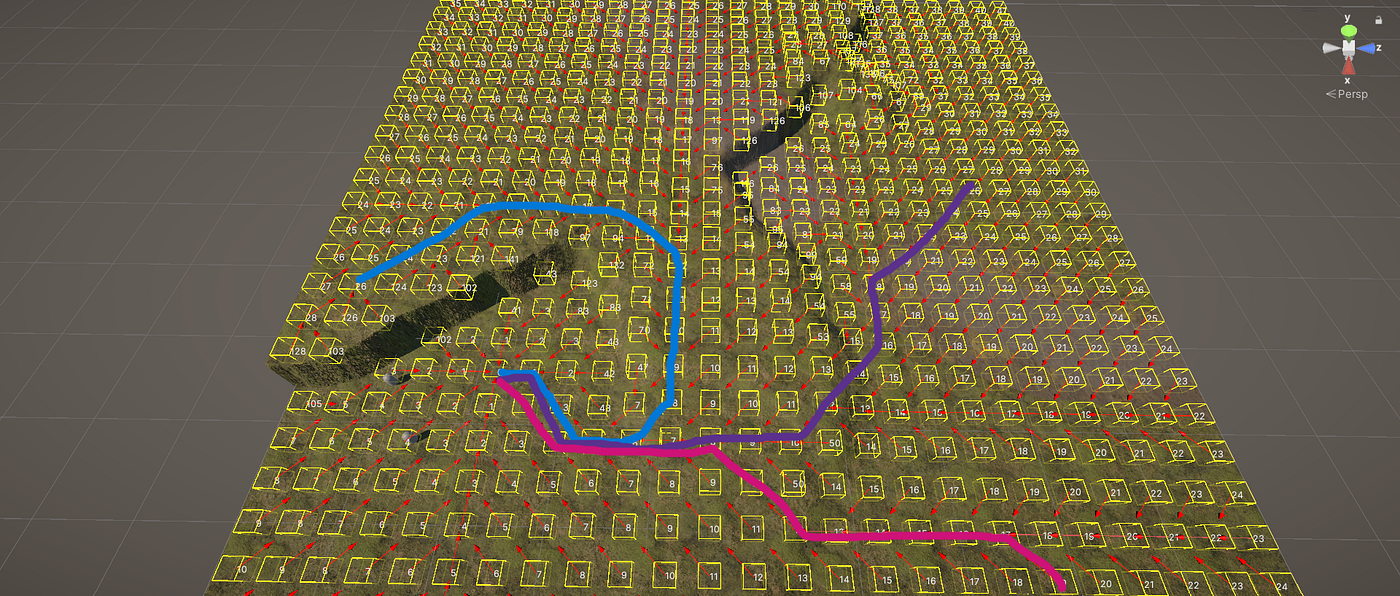
As you can see we have created a vector field that encompasses the whole terrain. Each vector is pointing towards the neighbour with the lowest best cost thanks to the integration field. I drew a few paths to show how the agent would move. And please notice that only the cells that have a height difference of 1 with their neighbours can point to each other, so any two cells with a height difference of 2 or more will not point to each other.
Let’s see how this looks in the code as well:
public void CreateFlowField()
{
    foreach (Cell cell in grid)
    {
        float bestCost = cell.bestCost;
        Cell bestNeighbour = null;

        List<Cell> neighbours = GetNeighbourCells(cell.gridPosition, GridDirection.AllDirections);

        foreach (Cell neighbour in neighbours)
        {
            if (neighbour.bestCost < bestCost && Mathf.Abs(neighbour.height - cell.height) < 2)
            {
                bestCost = neighbour.bestCost;
                bestNeighbour = neighbour;
            }
        }

        if (bestNeighbour != null)
        {
            cell.bestDirection = GridDirection.GetDirectionFromV2I(bestNeighbour.gridPosition - cell.gridPosition);
        }
    }
}
Now finally, let’s see our little agents in action:
As you can see, even though the agents are really close to the shorter path they choose the longer path since it’s smoother. And we do this without having to add any obstacles to the terrain. This is the power of the goal-based vector field pathfinding algorithm.
Thanks a lot for reading, I hope you enjoyed the article. If you have any questions or suggestions you can contact me on my social media accounts.